Gesamtzahl der Seitenaufrufe

Posts mit dem Label Crackle Glaze werden angezeigt. Alle Posts anzeigen

Sonntag, 25. September 2022

Last Days of Summer

Hallo all, nice to have you here today!

For my second project for the September challenge "Season of mists and mellow fruitfulness" at Country View Challenges I made another art journal page. This page was inspired from several Mixed Media artists, among others fom Nuneka and Asia Marquet aka Lemoncreation.


 I stayed with the mist theme this time again.

I used a Mixed Media paper and prepared it with a layer of clear Gesso, because I knew I wanted to use a lot of water and different mediums.
After it was dry I started with some stamping at the background. I used a lot of very old stamps from Hampton Art "Artsy Edges", Bo Bunny "Stitches" and a postage stamp, I guess it´s from Prima.

Next I added a generous amount of DecoArt media Crackle Glace clear with a palette knife and some heavy white Gesso from finnabair (you can find a lot of finnabair products in the shop), I let it dry naturally over night.
Next I glued down some diecut word circles (Alexandra Renke), they are thin canvas - I would not recommend to use canvas, the words are not clearly visible, but in this case I didn´t mind at all.

Time for colour now!
First I spritzed some water on top of the background, thenI used some magicals from Lindy´s Stamp Gang (tainted love teal and Dark Chocolate Brown) and added more water. 
I love, how the colours run into the crackle lines, it´s fascinating again and again!
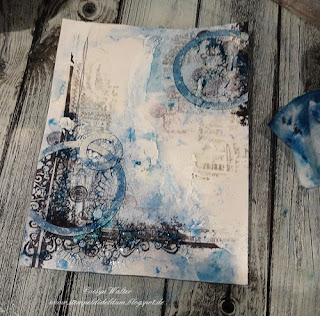
To finish the background I added black splashes with calligraphy ink from Rohrer & Klinger and when they were dry some white circles with a white Gelli Roll pen and distressed the edges with black Archival Ink.

I matted the page on black cardstock before I glued down the big moth and the words.
The moth is a stamp from the visible image stamp set "Glimmer of Light" (you will find tons of amazing visible image products in the shop!). The words are made with my Dymo Lable maker.


Here are some close up photos:


That´s it for today, we will meet next month again I hope!

If you want, you can join in with our challenge, there are a few days left. As always there is the chance to win a 20 £ voucher for the shop. Hope to see your make!

Thank you for your visit today and have a wonderful time!


Samstag, 9. Februar 2019

Black and White 2

Hello and welcome to my second inspiration project for the challenge over at Country View Challenges!
As you may know, the theme this month is Black & White or Black & White with one other colorl.

For my first piece I made a wall hanger, for this I made a video, where you can watch how I made it.

My second piece is a card. It´s made pretty much like the first one, I only changed the stencils and stamps and added a few embellishing.


I used the stamp set Theories from Tim Holtz - I really love the images from this set and the sentiments as well!

To get a really black image, I stamped the ballon man 3 times. I used the stamp platform for it. I couldn´t resist to make the little heart red and I like this tiny hint of color on this card!


I embellished the card with black and white threat and a single white flower.The sentiment I embossed with black Embossing Powder and matted it with some dried babywipe.


I also used the sentiment stamp on the background and also parts of the ballon man stamp.


Finally I matted the card with black cardstock and glued it to the card. To repeat the pattern at the inside, I stamped the graffitti parts of the ballon man stamp with white ink on a stripe of black cardstock and glued it to the right edge of the card.


Now I hope you like my card and feel inspired to join the challenge at Country View Challenges!
te

Thank you for your visit and have a nice day!

Freitag, 1. Februar 2019

There is Always a Glimmer of Light


Hello dear visitors!
It´s the first of the month, it´s February - and that means: time for a new challenge over at Country View Challenges! 
This month my lovely team mate Sue has chosen the theme, Black and White or Black and White with one another. I really love this theme and I made a wall hanging with a quote for someone very special to me.


I made a process video, where you can watch me creating it, so sit back and enjoy watching!


Here are some close ups:


That´s it for today! I´ll be back at 9th of the month with my second inspiration piece.
Now it´s your turn, so grab all your black and white stash and join in with our challenge this month! As always you have the chance to win a 20£ voucher to spend in the shop!

Thank you for your visit and have a wonderful day!

Freitag, 1. Juni 2018

Be Happy! - Wall Hanging for Country View Challenges

Hello my dear friends! And welcome to my new followers, I´m very happy to have you here on my blog 💖
Today I want to share my project for the June Challenge at Country View Challenges. My lovely teamy Teresa is the hostess of it this month and she has chosen the theme: "The written word".


And here are some steps:
I took a very thick cardboard from a left over packaging and cut it to size (20cm x 30cm; about 8" x 12").

I covered it with a thick layer of white Gesso glued some stripes of old book pages randomly on top and added crackle paste and clear crackle glaze here and there in different thickness. Then I left it to dry over night.

Look, what stunning crackles appeared! I really love it, it´s always such a lovely surprise.

Next I fuzzy cut some clock faces from LaBlanche and glued them down with DecoArt Matte Medium.

Now it was time for some color: I used different shades of brown DecoArt Fluid Acrylics (Burnt Umber, Yellow Oxide, Transparent Yellow Iron Oxide, Titan buff), some coffee and some black and white Fluid Acrylics.

Then I played with some other colors (Cobalt Teal Hue, Quinacridone Gold, Antiquing cream Patina Green) until I was quite happy with it. After everything was dry, I added some modeling paste through the stencil #6 from AALL & CREATE (one of my new favourites) and left it to dry.


Meanwhile I prepared my vocal piece. I drew a heart on watercolor paper and cut it out. My desired look should be a kind of 3D, so I cut out another heart of thick cardboard, slightly smaller, glued it on the watercolor paper heart and squeezed the edges. Then I cut out another heart, way smaller than the others, and glued this one down in the middle, squeesing the edges of it too (I hope you understand, it´s hard to describe *lol*). The last step was to cut out another heart and paint it with two shades of red. The edges I distressed with black Archival ink.


Then I did some very light stamping and put it together with the bulky heart.


I went back to my cardboard and painted the modeling paste with cobalt teal hue, quinacridone gold and some Inka Gold Turquoise.

Some more stelciling with Archival Ink Jet Black,
Some background stamping with Archival Ink Potting Soil and Jet Black. I went around the edges with the black ink to frame it and added black and white splatters.


Now I prepared the background for my focal image. I took some gauze, cut it in a circle, distressed the edges and colored it with some Transparent Yellow Iron Oxide and some Quinacridone Gold combined with water.


For the next steps I don´t have pictures, sorry! But I´ll try to describe what I did.

I stamped the words with my new stamp set "Alphabetical" from Visible Image and Gabi´s Word Stamp Set from 49 Market. I cut it out, adherede it to the wall hanging with Matte Medium and when dry, I colored them with the same colors I used for the background. Then I took a fineline applicator, filled with 50:50 brown acrylic paint and airbrush medium and went over the letters. I also scribbled an uneven frame around.


To emphasize the saying even more against the pretty busy background, I surrounded the words with a black posca pen and spreat it with a nearly dry brush.

Now it was time to take care of my vocal point. I glued down my cut out gauze circle with matte medium and put some titan buff  fluid acrylic to the middle, to make sure, the heart will stand out later.
While the glue and paint are drying, I made a circle frame with some home rusted wire. I fixed it with some screw breads when the background was dry.
I glued the words "be happy" on top of the heart and glued it into the circle using matte gel.


As the final step I added some red sprinkles to the background - and that´s it!

Here are some close ups (yes, I´m in love with these crackles 😏)


So, now it´s enough for today! Thank you for your pacience!
I hope, you will find time to join in with our challenge "The Written Word" - the possibilities of use are nearly endless.
As always you have the chance to win a 20 £ voucher for the shop.
Hope to see you!
Thank you for your visit!

Sonntag, 1. Oktober 2017

Vintage Card for Country View Challenges

Hello all, nice to have you here!
For the October Challenge over at Country View Challenges  I made a card with autumnal colors.
Hallo zusammen, schön, dass ihr hier vorbeischaut!
Für die Oktober Challenge bei Country View Challenges  habe ich eine Karte mit herbstlichen Farben gestaltet.


here some steps:
Hier ein paar Schritte:
First I added some texture with a stencil and DecoArt Texture paste and let it dry. Then I stamped a little lable with Archival Ink Potting soil.
Zuerst habe ich mit DecoArt Texture Paste und einer Schablone etwas Textur aufgebracht und ließ es trocknen. Dann habe ich noch ein Label mit Archival Ink Potting soil aufgestempelt.


 Now I colored the whole page with Distress Paint antique linen.

Das Ganze habe ich mit Distress Paint antique linen eingefärbt.

The rised parts with the Texture Paste I colored with DP vintage photo.

Die erhöhten Partien habe ich mit DP vintage photo eingefärbt.

 I added some more color: green, yellow and orange. I used different mists.

Mehr Farbe kam dazu: grün, gelb und orange. I habe dazu verschiedene Sprühfarben benutzt.

 For more depth I added shadows with a water soluble pencil.

Für mehr Tiefe habe ich Schatten mit einem wasservermalbaren Stift ergänzt.
 Now I stamped some greenery. I used AI potting soil again.

Nun habe ich noch ein paar Blätter und Zweige aufgestempelt, wieder mit AI potting soil.
 At last I colored the edges with DI ground espresso.

Zum Schluss habe ich die Ränder mit DI ground espresso eingefärbt.

For the focal point I stamped one of the Ladies from the stamp set "Portraits" from Creative Expressions (you can find it in the shop).....

Für das Mittelmotiv habe ich eine der Damen von dem Stempelset "Portraits" von Creative Expressions (im shop erhältlich) aufgestempelt.....
... colored her with my Inktense pencils and glued a chipboard frame to the edges.

... malte sie mit meinen Inktense Farbstiften an und klebte einen Chipboard Rahmen außen an.

Some more color to the edges..... 


Danach noch ein wenig Farbe an den Rändern...


..... and then I coated the image with DecoArt Crackle Glaze and let it dry.

.....und dann das Bild mit DecoArt Crackle Glaze überziehen.

 After drying I wanted to make the cracks more visible and added distress paint vintage photo.
Ooooops. This was a mistake.

Nach dem Trocknen wollte ich die Brüche mehr hervorheben und habe das Ganze mit distress paint vintage photo überzogen. Ooooops - das war ein Fehler.

As you can see at the left - you can´t see anything anymore *lol*. So I stamped the lady again, this time on specialty stamping paper and repeated all other steps. Well, as you can see on the right side photo - the paper was too smooth for the Crackle paint and flaked off *mpf*. Well I did all steps a third time and now it was okay.
Wie ihr links sehen könnt - sieht man nix mehr *haha*. Also, das Ganze nochmal, diesmal auf Specialty Stamping Paper. Nuuuuuun - wie ihr rechts sehen könnt, war das Papier zu glatt für den Krackelierlack und alles blätterte ab *mpf*. Also, noch mal von vorne - und diesmal war ich mit dem Ergebnis zufrieden.

I put everything together, added some flowers and the stamped wish.

Jetzt habe ich alles zusammen gesetzt, noch ein paar Blüten aufgeklebt und den Glückwunsch gestempelt.

Here are some close ups:


Now I hope, you´ll find time to join in with our challenge this month. As always you can win a 20 £ voucher for the shop!
Thank you for stopping by today!

Ich hoffe, ihr findet Zeit bei unserer Herausforderung diesen Monat mitzumachen, wie immer könnt ihr £20.- als Gutschein für den shop gewinnen!
Vielen Dank fürs Reinschauen!