Gesamtzahl der Seitenaufrufe

Posts mit dem Label Karte werden angezeigt. Alle Posts anzeigen

Dienstag, 21. November 2017

Multilayered Card - DT project for Country View Challenges

Hello all, I hope you have a nice week so far. Thank you for being here today!
I want to show you my second project for the November challenge "stencils" over at Country View Challenges today.

This time I made a quite different card and I hope you like it.


Today I don´t have much step x step photos, I seemed to have neglected to take any more 'step' shots, but I´ll try to explain how this all came together.

I took different acrylic paints and brayered them onto the card. Next I used various stamps and stamped them randomly on top (you can see the butterfly from a Tim Holtz stamp set). The next step was to use stencils. I dabbed acrylic paint with a sponge through some stencils, using different colors and left it to dry.

I love the stencil and mask from Donna Downey , but I don´t have one, it´s not easy to get them here in Germany. So I decided to make some by my own.
I drew two silhouettes on cardboard and cut them out. My masks are ready! I placed them on top of my background and sponged black acrylic paint around the masks.


I surrounded the silhouettes with white posca pen and some bright Gelatos. At last I added the word stickers and that´s it.

I hope you liked my card and feel inspired to join in with our challenge. There is time enough to make something beautiful and, as you know, you have the chance to win a 20£ voucher for the shop!

So thank you for dropping in here!

Sonntag, 1. Oktober 2017

Vintage Card for Country View Challenges

Hello all, nice to have you here!
For the October Challenge over at Country View Challenges  I made a card with autumnal colors.
Hallo zusammen, schön, dass ihr hier vorbeischaut!
Für die Oktober Challenge bei Country View Challenges  habe ich eine Karte mit herbstlichen Farben gestaltet.


here some steps:
Hier ein paar Schritte:
First I added some texture with a stencil and DecoArt Texture paste and let it dry. Then I stamped a little lable with Archival Ink Potting soil.
Zuerst habe ich mit DecoArt Texture Paste und einer Schablone etwas Textur aufgebracht und ließ es trocknen. Dann habe ich noch ein Label mit Archival Ink Potting soil aufgestempelt.


 Now I colored the whole page with Distress Paint antique linen.

Das Ganze habe ich mit Distress Paint antique linen eingefärbt.

The rised parts with the Texture Paste I colored with DP vintage photo.

Die erhöhten Partien habe ich mit DP vintage photo eingefärbt.

 I added some more color: green, yellow and orange. I used different mists.

Mehr Farbe kam dazu: grün, gelb und orange. I habe dazu verschiedene Sprühfarben benutzt.

 For more depth I added shadows with a water soluble pencil.

Für mehr Tiefe habe ich Schatten mit einem wasservermalbaren Stift ergänzt.
 Now I stamped some greenery. I used AI potting soil again.

Nun habe ich noch ein paar Blätter und Zweige aufgestempelt, wieder mit AI potting soil.
 At last I colored the edges with DI ground espresso.

Zum Schluss habe ich die Ränder mit DI ground espresso eingefärbt.

For the focal point I stamped one of the Ladies from the stamp set "Portraits" from Creative Expressions (you can find it in the shop).....

Für das Mittelmotiv habe ich eine der Damen von dem Stempelset "Portraits" von Creative Expressions (im shop erhältlich) aufgestempelt.....
... colored her with my Inktense pencils and glued a chipboard frame to the edges.

... malte sie mit meinen Inktense Farbstiften an und klebte einen Chipboard Rahmen außen an.

Some more color to the edges..... 


Danach noch ein wenig Farbe an den Rändern...


..... and then I coated the image with DecoArt Crackle Glaze and let it dry.

.....und dann das Bild mit DecoArt Crackle Glaze überziehen.

 After drying I wanted to make the cracks more visible and added distress paint vintage photo.
Ooooops. This was a mistake.

Nach dem Trocknen wollte ich die Brüche mehr hervorheben und habe das Ganze mit distress paint vintage photo überzogen. Ooooops - das war ein Fehler.

As you can see at the left - you can´t see anything anymore *lol*. So I stamped the lady again, this time on specialty stamping paper and repeated all other steps. Well, as you can see on the right side photo - the paper was too smooth for the Crackle paint and flaked off *mpf*. Well I did all steps a third time and now it was okay.
Wie ihr links sehen könnt - sieht man nix mehr *haha*. Also, das Ganze nochmal, diesmal auf Specialty Stamping Paper. Nuuuuuun - wie ihr rechts sehen könnt, war das Papier zu glatt für den Krackelierlack und alles blätterte ab *mpf*. Also, noch mal von vorne - und diesmal war ich mit dem Ergebnis zufrieden.

I put everything together, added some flowers and the stamped wish.

Jetzt habe ich alles zusammen gesetzt, noch ein paar Blüten aufgeklebt und den Glückwunsch gestempelt.

Here are some close ups:


Now I hope, you´ll find time to join in with our challenge this month. As always you can win a 20 £ voucher for the shop!
Thank you for stopping by today!

Ich hoffe, ihr findet Zeit bei unserer Herausforderung diesen Monat mitzumachen, wie immer könnt ihr £20.- als Gutschein für den shop gewinnen!
Vielen Dank fürs Reinschauen!

Montag, 7. August 2017

Blue & Green Thank You Card - DT Project for Country View Challenges

Hello dear blogreader, I hope you have a wonderful summer so far!
For my second project for the August challenge over at Country View Challenges, I have a "Thank you"-card for you this time. I made it nearly the same way as my first card at the first of the month. You can find it here.

Hallo liebe Blog Leser, ich hoffe, ihr habt einen tollen Sommer bis jetzt!
Mein zweites Projekt für die August challenge bei Country View Challenges ist eine "Danke" Karte. Sie ist beinahe genauso gemacht wie die erste Karte Anfang des Monats. Ihr findet sie hier.


And this is what I did:
Und so habe ich sie gemacht:

I primed some white cardstock with Gesso and added texture through a stencil with Texture Paste from DecoArt.
When everything was dry, I took some of my LSG starburst mists and colored the background. I always dried the colors before adding the next to avoid mixing them too much.

Mein Kartenpapier habe ich mit Gesso grundiert und mit Hilfe einer Schablone und Texture Paste von DecoArt Textur erzeugt.
Nachdem alles getrocknet war, habe ich mit meinen LSG starburst Sprühfarben alles koloriert. Zwischen den einzelnen Farbaufträgen immer erst trocknen! Dadurch vermischen sich die Farben nicht zu sehr.


I stamped my "Thank you" - stamp with black Archival Ink four times on specialty stamping paper, sprinkled black embossing powder on top and heat embossed it. I also framed my card with Archival Ink.

Den "Danke" Stempel habe ich mit schwarzer Archival Ink vier Mal auf Specialty Stamping Paper gestempelt, schwarzes Embossingpulver aufgestreut und mit meinem Heißföhn geschmolzen. Die Karte wurde auch mit schwarzer Archival Ink eingerahmt.

 To make the saying more suitable to the card, I took some Distress Ink in tumbled glass and dyed the paper. Then I matted the little square with thick cardboard to make it stand out more.

Um das Spruchkärtchen an die Karte anzupassen, habe ich das Papier mit Distress Ink tumbled glass eingefärbt. Das kleine Quadrat habe ich dann mit dicker Pappe unterlegt um es ein wenig abzuhaben.
 Now I took some fibres and glued them with the saying to the middle of my card.

Danach habe ich ein paar Fasern und das Spruchkärtchen in die Mitte der Karte geklebt.

 Now some matching flowers.....

Nun noch passende Blümchen.....


Some background stamping.....

Ein bisschen Hintergrund stempeln....
....and the card was ready! 
...und die Karte ist fertig!

Some close ups:


Oh..... I needed another one and made this the same way, I only used different colors. I don´t want to withhold ;-)
Ach ja...... ich brauchte noch eine weitere Karte, die ist genau so wie die vorherige gemacht, nur mit anderen Farben. Die möchte ich euch natürlich nicht vorenthalten ;-)


 Now I hope you´ve got the desire to play along with our challenge. You can win a 20£ voucher for the shop as usual.

Ich hoffe, ihr habt Lust bekommen bei unserer Herausforderung mit zu machen. Ihr könnt wie immer einen 20£ Gutschein für den Shop gewinnen.

Thank you so much for stopping by!
Vielen Dank fürs Hereinschauen!


Dienstag, 1. August 2017

Fantasy Card - DT-Project for Country View Challenges

Hello all, nice to have you here!
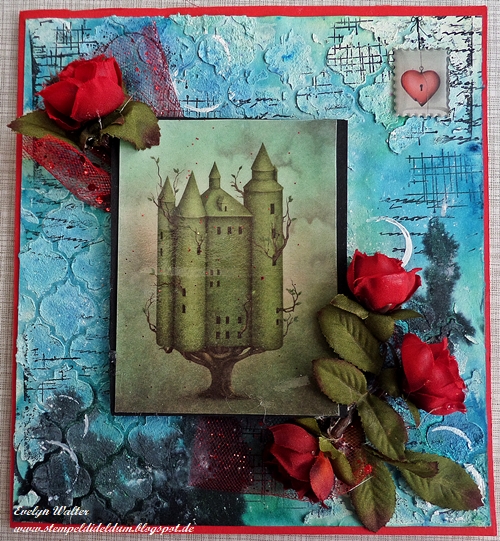
It´s the first of August and that means: a new challenge over at Country View Challenges! This time my lovely team mate Corrie hosted the theme and it is:
Blues and Greens.
I made a card for it - okay, there is some red in too, but I find, the background comes out even better with it ;-). But look by yourself!

Hallo zusammen, schön, dass ihr bei mir herein schaut!
Es ist tatsächlich schon der 1. August und das bedeutet: eine neue Herausforderung bei Country View Challenges! Diesmal hat meine liebe Teamkollegin Corrie das Thema ausgewählt und es lautet:
 Blau und Grün.
Ich habe eine Karte gemacht - okay, ein Touch rot ist auch dabei aber ich finde, dadurch leuchtet der Hintergrund noch mehr ;-). Aber urteilt selbst!


So hab ich´s gemacht:
That´s what I did:

Mein Papier habe ich zuerst mit Gesso grundiert und dann mit einer Schablone Strukturpaste aufgetragen. Nachdem alles getrocknet war, habe ich zwei meiner Magicals in blau und grün heraus gesucht, mit einer Sprühflasche und Wasser das Papier nass eingesprüht und mit Hilfe eines Pinsels das Farbpulver aufgestreut, so lang, bis ich mit dem Ergebnis zufrieden war. Dann wurde alles trocken geföhnt.

First I painted my paper with a layer of whit Gesso, took a stencil and structure paste and left it to dry. Now I grabbed a spray bottle with water, a paintbrush and two of my magical powders in blue and green. I sprinkled both onto my preweted paper until I liked it. Then I used my heating tool to dry.


Um das Ganze etwas kontrastreicher zu gestalten habe ich ein wenig schwarz und weiß ergänzt und anschließend noch ein bisserl gestempelt.
I decided to add some black and white for more interest and some contrast and some stamping.

 Das Phantasieschloss ist aus einem Papierset von LaBlanche. Die Oberfläche habe ich mit Americana Triple Thick Glanzlack überzogen, auf schwarzen Tonkarton montiert und mit etwas Glitzertüll aus meinem Vorrat aufgeklebt. Das Herz ist ein Epoxysticker und stammt auch aus diesem Set.
The fantasy castle comes from a paper set from LaBlanche. I coated the surface with Americana Triple Thick Gloss Glaze, matted it with black cardboard and glued it down. From my stash I used some glitter tulle to add some interest. The heart is a Epoxysticker from the same paper set.

Mit einem kleinen Deckel habe ich noch ein paar weiße Ringe gestempelt. Das funktioniert mit der dicken Tinte von 13@rts recht gut. Danach habe ich nur noch einige Rosen aufgeklebt (so ein wenig Dornröschen ;-) ) und fertig war die Karte.
I stamped some white rings with 13@rts ink and then I only had to add some roses - a little bit Cinderella ;-).

Some close ups:


Das wars für heute, ich hoffe, ich konnte euch ein wenig inspirieren und ihr macht bei unserer Challenge mit! Ihr könnt einen Gutschein für den Shop gewinnen.
Vielen Dank für euren Besuch!

That´s it for today, I hope I could inspire you a little bit and you will join in with our challenge! You can win a gift voucher for the shop!
Thank you for your visit!