Gesamtzahl der Seitenaufrufe

Dienstag, 5. Dezember 2017

Funny Santa

Hello all,
today I want to show you my second project for the December Challenge over at Country View Challenges!
Do you know this - you need a few of christmas cards, you can send by mail. So they can not be decorated too bulky and shouldn´t be too heavy weight, you don´t want to pay too much.
I made a fun card, you can easily send and which is good to make in series.


And this is what I did:
 First I cut out circles from specialty stamping paper.
 Then I cut out slightly bigger circles in colors fitting to the cards to mat the white circles.
 I chose the background papers.
 Now I stamped the funny Santa in the middle of the circles with Archival Ink.
 Now I colored the Santa. First the hat.....

 .....the nose.....
....shading to the beard.
 With the same colors of the hat I colored the sentiment stamp, cut it out and matted it.
 Now I cut out some Tim Holtz Greenery and then I put everything together.
Here are my cards:


I really love that fun stamp!

Now I hope you will share you christmas makes with us and join in with our challenge!
You have muuuuuuuch time left! =)

Now I want to thank you for your visit and wish you a very Merry Christmas and a Happy New Year!
Have a good time and we will hopfully meet again next year!

Freitag, 1. Dezember 2017

Celebrate the Season! - DT-Project for Country View Challenges

Hello dear Blogfriends, welcome to my blog today!
The countdown is running - only 24 days left to Christmas.
But it´s also the first of the month, what means: a new challenge over at Country View Challenges.
This time the lovely Debs is hosting the theme:  "Christmas Theme, Reds, Greens & (optional) Rust"

I made a very vintage card in red and green.


And this is what I did:

First I chose a nice patterned background paper and a fitting image. The background paper I distressed at the edges with a knife, colored the edges with green Archival ink and DO frayed burlap. Then I glued it down on top of a card.
 I fuzzy cut the image and distressed the edges again with DO frayed burlap.
I matted the image with green cardstock, added some cardboard at the back and glued it onto the card. 
Now I took some chipboard pieces and painted them with white Gesso, 
 colored them with Archival Ink Library Green
and heat embossed the pieces with two different green embossing powders. 
Then I put them around the image, added some liquid pearls in red and glued down some flowers. 
 Now I stamped a seasonal stamp and embossed it with the same green embossing powder as I used on the chipboard pieces.

 To make the sentiment fit better, I used again DO frayed burlap and drippled some water on top for even more interest.
I glued it down with foam squares, 
and lastly I added some white splatters with watered down Gesso.


Here are some close ups: 


Well, that´s it for today, I´ll be back at the 5th of December with my second inspiration, I hope to see you here again!
Now I hope you will find time to join in with our challenge this month, as usual you have the chance to win a 20 £ voucher for the shop!

Thank you for your visit and try to have a not too busy time!

Dienstag, 21. November 2017

Multilayered Card - DT project for Country View Challenges

Hello all, I hope you have a nice week so far. Thank you for being here today!
I want to show you my second project for the November challenge "stencils" over at Country View Challenges today.

This time I made a quite different card and I hope you like it.


Today I don´t have much step x step photos, I seemed to have neglected to take any more 'step' shots, but I´ll try to explain how this all came together.

I took different acrylic paints and brayered them onto the card. Next I used various stamps and stamped them randomly on top (you can see the butterfly from a Tim Holtz stamp set). The next step was to use stencils. I dabbed acrylic paint with a sponge through some stencils, using different colors and left it to dry.

I love the stencil and mask from Donna Downey , but I don´t have one, it´s not easy to get them here in Germany. So I decided to make some by my own.
I drew two silhouettes on cardboard and cut them out. My masks are ready! I placed them on top of my background and sponged black acrylic paint around the masks.


I surrounded the silhouettes with white posca pen and some bright Gelatos. At last I added the word stickers and that´s it.

I hope you liked my card and feel inspired to join in with our challenge. There is time enough to make something beautiful and, as you know, you have the chance to win a 20£ voucher for the shop!

So thank you for dropping in here!

Mittwoch, 1. November 2017

Stencils - DT project for Country View Challenges


Hello dear followers!
It´s the first day of November and that means: time for the November Challenge over at Country View Challenges! This time the lovely Gabrielle has chosen the theme "stencils".
I love to use stencil in my projects and I would love to buy all of them *lol*.
For my first project I made a card for the 50th birthday of a man.


I used two different stencils and colored them with DI walnut stain, using a sponge.

Here are some close ups:


Now I hope you will find time to join in with our challenge this month, as usual you have the chance to win a 20 £ voucher for the shop!
Happy November and thank you for your visit!

Layout "Make a Wish" - DT project for ARTastic

Hello everybody, nice to have you here!
Today I want to share my layout for the November Challenge over at ARTastic challenge blog with you.
This month the inspiration comes from  Poncho Army  and is called Landing. The CRITERIA is: Use a BLACK background.
I was inspired by the bold colors of the bird and used the blue of him on the background and, fitting to my photo, pink.


Here are some steps:
First I brayered acrylic paints in blue tones and pink tones on the background. Then I did some stamping and heat embossed them with EP in white, pink and blue-green (not very much visible, but it gives a wonderful shimmer =) ). Then I stamped some more patterns with Distress Oxides and Archival ink in blue (again hard to see ;-) )


Now I layered my photo with cardstock in blue and pink and distressed pieces of gauze. To make them more matching I colored them with some pink mist.

Next I heat embossed some chipboard pieces with pink and cranberry embossing powder. 


Then I put everything together, added a stamped sentiment and some flowers - and that´s it!


Now I hope you will join in with our challenge this month!
Thank you for your visit!

Montag, 16. Oktober 2017

Layout "Lisbeth" for the Canvas Corp Brands October Challenge

Hello dear followers, a warm welcome here on my blog!
Today I want to show you my take on the October Challenge "Books" over at Canvas Corp Brands.

Kein automatischer Alternativtext verfügbar.

Hallo liebe Blog Leser, willkommen auf meinem Blog!
Heute möchte ich euch meinen Beitrag zur Oktober Herausforderung "Bücher" bei Canvas Corp Brands zeigen.


If you want to see more details please visit the CCB blog. There you can find a link to my video tutorial too!

....................and of course there is plenty of time to join in with our challenge!
Here are some informations:
 To enter this challenge you need to link up your entry  Blog post, or post on Instagram, Facebook or Pinterest (link to the actual project – not the whole page) by using the linkytool below. You have until the end of November 5 to submit your project!  All submissions must have #ccbchallenge somewhere to be considered. Only 1 entry per person allowed. Are you a previous winner? That does NOT exclude you for winning again – please join in!!

We will invite the winner of the challenges to be our Guest Designer in December. This means that they will get a box filled with goodies from all 3 Canvas Corp Brands to play with.

Wenn ihr mehr Details sehen möchtet, hüpft doch rüber auf den CCB Blog. Da findet ihr auch einen Link zu meinem Video Tutorial!

......................und natürlich ist noch jede Menge Zeit für euch, bei unserer Challenge mit zu machen!
Hier ein paar Informationen:
Um bei dieser Challenge mit zu machen, verlinke deinen Beitrag: Blog post oder post auf Instagram, Facebook oder Pinterest. Verlinke das aktuelle Projekt - nicht die ganze Seite) mit dem linkytool unten. Du hast Zeit bis zum 5. November um teilzunehmen! Alle Beiträge müssen irgendwo #ccbchallenge haben um gültig zu sein. Nur 1 Beitrag pro Person ist erlaubt. Hast du schon früher einmal gewonnen? Das nimmt dich NICHT von einem erneuten Gewinn aus - nimm gerne wieder teil!

Der Gewinner der Challenge wird eingeladen unser Gast Designer im Dezember zu werden. Das bedeutet, du bekommst eine Schachtel, gefüllt mit Geschenken von allen 3 Canvas Corp Marken um damit zu spielen.

Freitag, 13. Oktober 2017

Canvas "Falling Leaves" - DT Project for Country View Challenges

Hello dear visitors,
 welcome to my second project for the October challenge over at Country View Challenges!
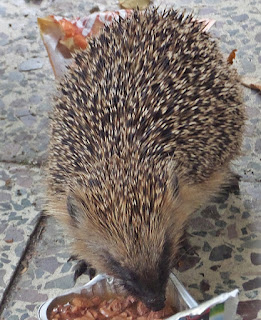
Autumn is showing it´s most wonderful side here in Bavaria with nice sunny weather and all it´s glowing colors. Last weekend we had a little autumnly visitor here.

Hallo liebe Besucher,
willkommen zu meinem zweiten Projekt für die Oktober Herausforderung bei Country View Challenges! Der Herbst zeigt sich hier in Bayern von seiner schönsten Seite mit sonnigem Wetter und all seinen glühenden Farben. Letztes Wochenende hatten wir auch einen kleinen herbstlichen Besucher.

Cute, isn´t he?
Putzig oder?
But now to my take on the challenge:
Aber nun zu meinem Beitrag für die Challenge:


I made a little canvas with colorful leaves. The leaves are made from modeling clay and I used the Tim Holtz Alterations "Layering Leaf" die and embossing folder from Sizzix. I made a little video, where you can see how I made it. Enjoy watching!
Ich habe einen kleinen Keilrahmen mit bunten Blätter gemacht. Die Blätter sind aus Modelliermasse geformt. Dazu habe ich dieTim Holtz Alterations "Layering Leaf" Stanzschablone und Embossingfolder von Sizzix benutzt. Wenn ihr sehen wollt, wie ich das gemacht habe, schaut euch gerne mein kleines Video an. Viel Spaß!


Now to the canvas:
Nun zum Keilrahmen:

I prepared my canvas with one coat of Gesso and added Texture Crackle Paste (DecoArt) and Structur Paste (Pentart) for texture. I left it to dry.

Zuerst kam eine Schicht Gesso auf den Keilrahmen. Danach habe ich Texture Crackle Paste (DecoArt) and Structur Paste (Pentart) für einen texturierten Hintergrund aufgetragen.


When dry, I sprayed the whole surface with Tattered Angels Glimmer Mist "Stone" to break the white - it´s such a cool Mist! Look!

Nach dem Trocknen habe ich alles mit Tattered Angels Glimmermist "Stone" eingesprüht - das ist soo eine coole Farbe, schaut mal!


I added some spritzes of water and let the color run down for even more interest.

Ich habe ein paar Spritzer Wasser darauf gegeben und die Farbe fließen gelassen um den Hintergrund noch lebhafter zu gestalten.


I also added some sprinkles of PaperArtsy Infusions "The sage" and activated it with water. When dry, I glued down my leaves, some 3D Balls and colored them with watercolor. Then only some words (Big Chat) with foam squares and some shading around the leaves and I was ready.
Hinzu kamen noch ein paar Stäubchen PaperArtsy Infusions "The sage", die ich mit Wasser aktiviert habe. Nachdem alles getrocknet war, habe ich die Blätter  ein paar 3D Kugeln, die ich mit Wasserfarbe eingefärbt habe, aufgeklebt, ein paar Schattierungen rund um die Blätter noch und fertig!


That´s it for today! Now I hope, you will join in with our challenge, there is plenty of time left.
As always you have the chance to win a 20 £ voucher for the shop.
Thank you for your visit and have a wonderful weekend!

Das war´s für heute! Ich hoffe, ihr macht bei unserer Challenge mit, es ist noch reichlich Zeit. Wie immer könnt ihr einen Gutschein über 20 £ für den shop gewinnen.
Vielen Dank für euren Besuch und ein wunderschönes Wochenende!