Gesamtzahl der Seitenaufrufe

Posts mit dem Label step x step werden angezeigt. Alle Posts anzeigen

Donnerstag, 1. November 2018

Artist Trading Coins for Country View Challenges

Hello dear visitors and a special welcome to my 100th follower! I am very happy to see you here!

November already and time for a new challenge over at Country View Challenges.
This month the theme is: Artist Trading Coins!

I love to make this little treasure coins, they are so cute and a great opportunity to use your scraps or parts of a not very well accomplished backgroundpaper.

Here are my ATCoins:


And this is what I did:

I used this paper, on which I cleaned my brayer 
and tried some new stamps.
Well - never throw away something! 😉

I punched out some 2 1/2" circles.


I matted them with cardboard to make them sturdier....


sealed the surface with transparent Gesso...

 on some parts I brushed crackle glaze for more interest.
 I took some stencils and Distress Oxides in matching colors to add some texture, ...

 and framed the coins with black soot Distress Oxide.
 I wanted to have some white space, so I took white acrylic paint and spreaded it with my fingers.
 I tinted tiny distressed pieces of cloth, ...


...gathered some small and tiny flowers...


and glued them down


Next I mixed Mini Art Stones with golden splash paint and added some white glue before I decorated the coins.


Now I sprinkled some glitter on top and when everything was dry, I added word stickers and some white highlights with a gelpen here and there.
Last step was to glue some scrap paer in black to the back and stamp the date.


Well, I fear I have overdone them a little bit - but, it is what it is.


Here are the coins one after another:


That´s it for today!
I hope, you will jump in to the fun and show us your little Artist Trading Coins! You know, you can win a 20 £ voucher for the shop!

Thank you for your visit and have a wonderful day!

Dienstag, 21. November 2017

Multilayered Card - DT project for Country View Challenges

Hello all, I hope you have a nice week so far. Thank you for being here today!
I want to show you my second project for the November challenge "stencils" over at Country View Challenges today.

This time I made a quite different card and I hope you like it.


Today I don´t have much step x step photos, I seemed to have neglected to take any more 'step' shots, but I´ll try to explain how this all came together.

I took different acrylic paints and brayered them onto the card. Next I used various stamps and stamped them randomly on top (you can see the butterfly from a Tim Holtz stamp set). The next step was to use stencils. I dabbed acrylic paint with a sponge through some stencils, using different colors and left it to dry.

I love the stencil and mask from Donna Downey , but I don´t have one, it´s not easy to get them here in Germany. So I decided to make some by my own.
I drew two silhouettes on cardboard and cut them out. My masks are ready! I placed them on top of my background and sponged black acrylic paint around the masks.


I surrounded the silhouettes with white posca pen and some bright Gelatos. At last I added the word stickers and that´s it.

I hope you liked my card and feel inspired to join in with our challenge. There is time enough to make something beautiful and, as you know, you have the chance to win a 20£ voucher for the shop!

So thank you for dropping in here!

Dienstag, 1. August 2017

Fantasy Card - DT-Project for Country View Challenges

Hello all, nice to have you here!
It´s the first of August and that means: a new challenge over at Country View Challenges! This time my lovely team mate Corrie hosted the theme and it is:
Blues and Greens.
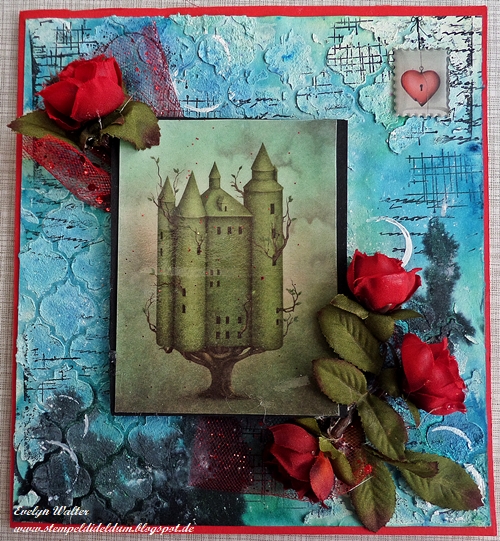
I made a card for it - okay, there is some red in too, but I find, the background comes out even better with it ;-). But look by yourself!

Hallo zusammen, schön, dass ihr bei mir herein schaut!
Es ist tatsächlich schon der 1. August und das bedeutet: eine neue Herausforderung bei Country View Challenges! Diesmal hat meine liebe Teamkollegin Corrie das Thema ausgewählt und es lautet:
 Blau und Grün.
Ich habe eine Karte gemacht - okay, ein Touch rot ist auch dabei aber ich finde, dadurch leuchtet der Hintergrund noch mehr ;-). Aber urteilt selbst!


So hab ich´s gemacht:
That´s what I did:

Mein Papier habe ich zuerst mit Gesso grundiert und dann mit einer Schablone Strukturpaste aufgetragen. Nachdem alles getrocknet war, habe ich zwei meiner Magicals in blau und grün heraus gesucht, mit einer Sprühflasche und Wasser das Papier nass eingesprüht und mit Hilfe eines Pinsels das Farbpulver aufgestreut, so lang, bis ich mit dem Ergebnis zufrieden war. Dann wurde alles trocken geföhnt.

First I painted my paper with a layer of whit Gesso, took a stencil and structure paste and left it to dry. Now I grabbed a spray bottle with water, a paintbrush and two of my magical powders in blue and green. I sprinkled both onto my preweted paper until I liked it. Then I used my heating tool to dry.


Um das Ganze etwas kontrastreicher zu gestalten habe ich ein wenig schwarz und weiß ergänzt und anschließend noch ein bisserl gestempelt.
I decided to add some black and white for more interest and some contrast and some stamping.

 Das Phantasieschloss ist aus einem Papierset von LaBlanche. Die Oberfläche habe ich mit Americana Triple Thick Glanzlack überzogen, auf schwarzen Tonkarton montiert und mit etwas Glitzertüll aus meinem Vorrat aufgeklebt. Das Herz ist ein Epoxysticker und stammt auch aus diesem Set.
The fantasy castle comes from a paper set from LaBlanche. I coated the surface with Americana Triple Thick Gloss Glaze, matted it with black cardboard and glued it down. From my stash I used some glitter tulle to add some interest. The heart is a Epoxysticker from the same paper set.

Mit einem kleinen Deckel habe ich noch ein paar weiße Ringe gestempelt. Das funktioniert mit der dicken Tinte von 13@rts recht gut. Danach habe ich nur noch einige Rosen aufgeklebt (so ein wenig Dornröschen ;-) ) und fertig war die Karte.
I stamped some white rings with 13@rts ink and then I only had to add some roses - a little bit Cinderella ;-).

Some close ups:


Das wars für heute, ich hoffe, ich konnte euch ein wenig inspirieren und ihr macht bei unserer Challenge mit! Ihr könnt einen Gutschein für den Shop gewinnen.
Vielen Dank für euren Besuch!

That´s it for today, I hope I could inspire you a little bit and you will join in with our challenge! You can win a gift voucher for the shop!
Thank you for your visit!

Samstag, 1. Juli 2017

Card with a Bird - DT project for Country View Challenges

Hello everybody, nice to have you here today!
As usual at the first of each month we have a brand new challenge at Country View Challenges for you. This time the theme is "Things with wings"  chosen by my lovely team mate Jane - what a great theme with so many possibilities!
It´s the first of July and the summer is in full flow. And what do you hear first when you wake up in the morning? Twittering birds!
So I made a little quick and easy card with one of the super cute Scribbly Small Birdies stamps from Dina Wakley - I love them!


Hallo zusammen, schön, dass ihr heute bei mir vorbeischaut!
Wie an jedem ersten des Monats haben wir auch dieses Mal wieder eine brandneue Herausforderung bei Country View Challenges für euch. Diesmal lautet das Thema "Alles was Flügel hat" - was für ein tolles Thema mit unglaublich vielen Möglichkeiten!
Es ist der erste Juli und der Sommer ist in vollem Gange. Was hörst du, wenn du morgens aufwachst als erstes? Vogelgezwitscher!
Ich habe deshalb eine einfache und schnelle Karte mit einem der super süßen Scribbly Small Birdies Stempeln von Dina Wakley gemacht - ich liebe diese Stempel!


Here is what I did:
So habe ich´s gemacht:

 I stamped one of the birds on a mixed media paper with staz on in Jet black and colored him with my Inktense pencils and activated them with water.
Zuerst habe ich einen der putzigen Vögelchen auf Mixed Media Papier gestempelt (StazOn Jet Black) und ihn mit meinen Inktense Stiften ausgemalt, die ich dann mit Wasser aktiviert habe.

 I clear embossed the bird  to protect it.
Danach habe ich den Vogel zum Schutz klar embossed.

 Now I stamped some grass from the stamp set Portraits from Creative Expressions.
Die Gräser von dem Stempelset Portraits von Creative Expressions habe ich als Hintergrund gestempelt.

 Some doodling with my black Pitt Pen from Faber Castell brings more interest.
Mit meinem Pitt Pen von Faber Castell habe ich ein paar Linien gekritzelt um alles etwas lebendiger zu gestalten.

 Now I colored the background with Distress Oxides in broken china and peeled paint, which I watered down for a light finish.
Den Hintergrund habe ich mit sehr wässrigen Distress Oxides coloriert um ihn möglichst hell zu halten.

 I distressed the edges with Archival ink leaf green and also surrounded the bird and the wordsticker from Tim Holtz with it. At last I did some more doodling and - ready!
Die Ränder habe ich mit Archival Ink leaf green eingefärbt, damit habe ich auch den Vogel und die Wortsticker von Tim Holtz umrandet. Zum Schluss noch ein wenig Doodling und - fertig!


Now I hope you´ll find time to join in with our challenge this month! You can win a 20£ voucher for the shop!
Thank you for dropping in!

Nun hoffe ich, ihr findet Zeit bei unserer Herausforderung diesen Monat mitzumachen! Ihr könnt einen 20£ Gutschein für den Shop gewinnen!
Danke fürs Reinschauen!

Freitag, 19. Mai 2017

Feminin Card - DT work for Country View Challenges

Hello my dear blogfriends,
today I want to share my second take on this month´s challenge "Flower Power" over at Country View Challenges!
This time I made a very feminin card - and what would be a female card without flowers!
There are so many wonderful flowers on the market and I decided to use some of them on my card.
By adding flowers, you always can pimp your artwork - real flower power! ;-)

Hallo liebe Blogfreunde,
heute möchte ich meine zweite Arbeit für diesen Monat für die Herausforderung "Flower Power" bei Country View Challenges vorstellen.
Diesmal habe ich eine sehr feminine Karte gemacht - und was wäre eine Karte ohne Blumen!
Es gibt so viele wunderschöne Blumen zu kaufen und ich habe beschlossen, einige davon auf meiner Karte zu verwenden.
Mit Blumen kann man einfach jedes Kunstwerk aufwerten - absolute "Flower Power"! ;-)


And this is what I did:
Und so wird´s gemacht:

First I gathered all papers I needed, cut it into size and matted my picture with black cardstock.
Zuerst habe ich alle Papiere, die ich verwenden wollte, zusammengesucht, zugeschnitten und mein Bild mit schwarzem Tonpapier hinterlegt.


I also gathered the embellishments I wanted to use together with a stencil and some modeling paste.
Danach habe ich alle Verzierungen, eine Schablone und Modellierpaste bereit gestellt.

First I put the modelling paste through a stencil (13@rts) on top of the paper.
Zuerst kam Modellierpaste durch eine Schablone (13@rts) auf das Papier.

Now I distressed the edges and colored them with DI peacock feathers. Then I glued down all the embellishments and my picture.
Danach habe ich die Ränder aufgerauht und mit DI peacock feathers eingefärbt. Im Anschluss habe ich alle Verzierungen und das Bild aufgeklebt.

I sprinkled white Gesso on top and now  - Flower Power! Can you see, how these three flowers pimp the card? 
Nun noch ein paar Spritzer weißes Gesso oben auf und dann - Flower Power! Seht ihr, wie so ein paar Blümchen die ganze Karte aufpimpen?

Here are some close ups:
Hier noch ein paar Detailaufnahmen:


Now it´s your turn to show us your flower power over at Country View Challenges! You have time enough to join in. Don´t forget - you can win a 20 £ gift voucher for the shop!
Jetzt ist es an euch uns eure Flower Power bei Country View Challenges zu zeigen! Denkt dran - Ihr könnt einen 20£ Gutschein für den shop gewinnen!


I want to join in following challenges:
http://mixedmediawarriors.blogspot.de/2017/05/wyzwanie-16-majowy-spacer-mmw-16.html
 I was inspired by the flower pot, the teal stones and the elegant written word, I also used the pink of the flowers in the 4th picture.
http://creativeartistemixedmedia.blogspot.de/2017/05/welcome-to-creative-artistes-challenge.html
http://stampsandstencils.blogspot.de/2017/05/fabric-and-fibres.html