Gesamtzahl der Seitenaufrufe

Posts mit dem Label Lindy´s Stamp Gang Magicals werden angezeigt. Alle Posts anzeigen

Sonntag, 9. April 2023

Explore!

Hello and Happy Easter to all of you!

Today I want to share with you my second post for the April challenge "Things with Wings" at Country View Challenges.

This time I made a art journal page.


 I had much fun to create the page, using a picture of a magzine from the Supermarket 😉😊.

The page is quite easy to make:

First I gessoed the paper to prepare it, then I used some magical sifters from Lindy´s (Octopus Eyes Aqua, Sea Turtle Teal and Jellyfish Sting Pink). I spritzed water onto the page and sprinkled the magicals on top. Some more water helped to spread the colour. After drying the ink, I took a homemade collage tissue and teared it in pieces, which I glued down randomly using matte medium. You really have to be careful and only tap with a brush on the tissue, it is very fragile!

I ripped out the little Lady from a magazine, gave her some transparent wings (Tim Holtz) and glued her to the page.


Now I did some stamping with some of my favourite stamps from LaBlanche with Versafine fine detail ink in onyx black, took then a black fineliner and doodled arround the edges of my colour. I also glued down one more transparent wing on one of the branches.


I wrote the word "Explore" with a white gelly Roll pen, made a lot of white tiny dots, set some highlight here and there - and that´s it!


Now I hope, the Easter Bunny brought you some yummy eggs and may be, you´ll find time to make something with wings for our challenge!

Thank you for your visit today and again Happy Easter!
xxx

Sonntag, 25. September 2022

Last Days of Summer

Hallo all, nice to have you here today!

For my second project for the September challenge "Season of mists and mellow fruitfulness" at Country View Challenges I made another art journal page. This page was inspired from several Mixed Media artists, among others fom Nuneka and Asia Marquet aka Lemoncreation.


 I stayed with the mist theme this time again.

I used a Mixed Media paper and prepared it with a layer of clear Gesso, because I knew I wanted to use a lot of water and different mediums.
After it was dry I started with some stamping at the background. I used a lot of very old stamps from Hampton Art "Artsy Edges", Bo Bunny "Stitches" and a postage stamp, I guess it´s from Prima.

Next I added a generous amount of DecoArt media Crackle Glace clear with a palette knife and some heavy white Gesso from finnabair (you can find a lot of finnabair products in the shop), I let it dry naturally over night.
Next I glued down some diecut word circles (Alexandra Renke), they are thin canvas - I would not recommend to use canvas, the words are not clearly visible, but in this case I didn´t mind at all.

Time for colour now!
First I spritzed some water on top of the background, thenI used some magicals from Lindy´s Stamp Gang (tainted love teal and Dark Chocolate Brown) and added more water. 
I love, how the colours run into the crackle lines, it´s fascinating again and again!

To finish the background I added black splashes with calligraphy ink from Rohrer & Klinger and when they were dry some white circles with a white Gelli Roll pen and distressed the edges with black Archival Ink.

I matted the page on black cardstock before I glued down the big moth and the words.
The moth is a stamp from the visible image stamp set "Glimmer of Light" (you will find tons of amazing visible image products in the shop!). The words are made with my Dymo Lable maker.


Here are some close up photos:


That´s it for today, we will meet next month again I hope!

If you want, you can join in with our challenge, there are a few days left. As always there is the chance to win a 20 £ voucher for the shop. Hope to see your make!

Thank you for your visit today and have a wonderful time!


Sonntag, 13. Februar 2022

Happy Valentines Day!

 Hello!

Welcome to my second post for the "Hearts and Flowers"-challenge over at Country View Challenges

Tomorrow it´s Valentines Day and so I made a Velentines Day Card.


I used some stamp sets from PaperArtsy for the heart and garlands and the script. The tiny flowers are another stamp set from PaperArtsy.

I made a picture from all the supplies I used, you can see them here:


I made a video and if you want to watch the process, click play and have fun!


Now I hope I could inspire you a little bit and you will join in with our challenge this month!
You have got plenty of time left to make something beautiful. You know, you can win a 20 £ voucher for the shop!

Have a week full of love!

Thank you for your visit!


Montag, 9. August 2021

Monochromatic Cards - Three Of A Kind

 Hello and welcome to my second inspiration for the August Challenge "monochromatic" over at Country View Challenges!

This time I made not only one card - I made three, three of a kind. Well, to be honest - there will be much more, I´m doing the birthday cards for my collegues for the next school year, and they will be all of a kind, only the colors will be different.

Well, I decided to show you the red ones.


I have made a process video, so if you want to watch you can watch it here:


Here are some more pictures:


And here you can see some more cards, these are the ones I made so far...


Now it´s your turn to make some monochromatic art for our challenge, I am looking forward to seeing your projects!

Thank you for your visit today and have a great week!

Donnerstag, 4. Juli 2019

Art Journal Page #6 for Rubber Dance

Hello everybody!
Today I want to share with you a sneak peek of my page #6 in my Happy Journal, I made for Rubber Dance.


If you want to see more, please hop to the Rubber Dance blog!
I made a process video too, you can find it here:


Thank you for your visit today!

Dienstag, 1. August 2017

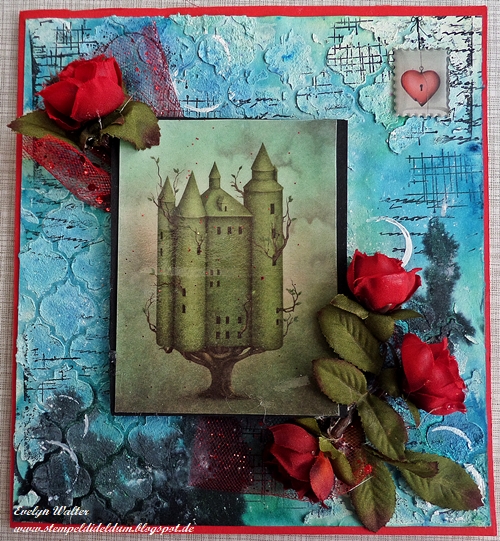
Fantasy Card - DT-Project for Country View Challenges

Hello all, nice to have you here!
It´s the first of August and that means: a new challenge over at Country View Challenges! This time my lovely team mate Corrie hosted the theme and it is:
Blues and Greens.
I made a card for it - okay, there is some red in too, but I find, the background comes out even better with it ;-). But look by yourself!

Hallo zusammen, schön, dass ihr bei mir herein schaut!
Es ist tatsächlich schon der 1. August und das bedeutet: eine neue Herausforderung bei Country View Challenges! Diesmal hat meine liebe Teamkollegin Corrie das Thema ausgewählt und es lautet:
 Blau und Grün.
Ich habe eine Karte gemacht - okay, ein Touch rot ist auch dabei aber ich finde, dadurch leuchtet der Hintergrund noch mehr ;-). Aber urteilt selbst!


So hab ich´s gemacht:
That´s what I did:

Mein Papier habe ich zuerst mit Gesso grundiert und dann mit einer Schablone Strukturpaste aufgetragen. Nachdem alles getrocknet war, habe ich zwei meiner Magicals in blau und grün heraus gesucht, mit einer Sprühflasche und Wasser das Papier nass eingesprüht und mit Hilfe eines Pinsels das Farbpulver aufgestreut, so lang, bis ich mit dem Ergebnis zufrieden war. Dann wurde alles trocken geföhnt.

First I painted my paper with a layer of whit Gesso, took a stencil and structure paste and left it to dry. Now I grabbed a spray bottle with water, a paintbrush and two of my magical powders in blue and green. I sprinkled both onto my preweted paper until I liked it. Then I used my heating tool to dry.


Um das Ganze etwas kontrastreicher zu gestalten habe ich ein wenig schwarz und weiß ergänzt und anschließend noch ein bisserl gestempelt.
I decided to add some black and white for more interest and some contrast and some stamping.

 Das Phantasieschloss ist aus einem Papierset von LaBlanche. Die Oberfläche habe ich mit Americana Triple Thick Glanzlack überzogen, auf schwarzen Tonkarton montiert und mit etwas Glitzertüll aus meinem Vorrat aufgeklebt. Das Herz ist ein Epoxysticker und stammt auch aus diesem Set.
The fantasy castle comes from a paper set from LaBlanche. I coated the surface with Americana Triple Thick Gloss Glaze, matted it with black cardboard and glued it down. From my stash I used some glitter tulle to add some interest. The heart is a Epoxysticker from the same paper set.

Mit einem kleinen Deckel habe ich noch ein paar weiße Ringe gestempelt. Das funktioniert mit der dicken Tinte von 13@rts recht gut. Danach habe ich nur noch einige Rosen aufgeklebt (so ein wenig Dornröschen ;-) ) und fertig war die Karte.
I stamped some white rings with 13@rts ink and then I only had to add some roses - a little bit Cinderella ;-).

Some close ups:


Das wars für heute, ich hoffe, ich konnte euch ein wenig inspirieren und ihr macht bei unserer Challenge mit! Ihr könnt einen Gutschein für den Shop gewinnen.
Vielen Dank für euren Besuch!

That´s it for today, I hope I could inspire you a little bit and you will join in with our challenge! You can win a gift voucher for the shop!
Thank you for your visit!

Mittwoch, 1. März 2017

Layout "Special Moment" - DT-Work for ARTastic

Hallo zusammen, schön, dass ihr bei mir hereinschaut
Heute ist schon der erste März - Zeit für eine neue Herausforderung bei ARTastic!
Diesen Monat haben wir wieder einen tollen Künstler für euch, William Rose, und das ist eins seiner Bilder: An image of November
Wenn ihr auf dem Blog vorbeischaut, könnt ihr ein wenig mehr über ihn erfahren.
Aber nun zur Herausforderung. Diesmal müsst ihr eine Schablone benutzen! Einfach, was? 
Also versucht doch mal euer Glück und macht mit!

Kein automatischer Alternativtext verfügbar.

Hello everybody and a warm welcome to my blog!
Today it is the first of March - time for a new challenge over at ARTastic!
This month we have a wonderful artist for you, William Rose, and this is one of his pictures: An image of November.
 If you want to find out more about him and his artwork, hop over to the blog.
But now let´s come to our challenge. We ask you to use a stencil! Easy, huh?
So grab your stash and join in our challenge!

Hier ist mein layout:
This is my layout. 


Die Linien im Bild des Künstlers haben mich inspiriert. Also klebte ich zuerst einige Papierstreifen auf den Hintergrund und benutzte anschließend eine Schablone von 13arts, "shapes", um mit Modelliercreme weitere Linien zu schaffen. Danach habe ich den Hintergrund bestempelt - viele Stempel ;-). Danach kam Farbe ins Spiel (Lindy´s Stamp Gang Flat Fabios und Starburst). Danach noch einmal der Einnstatz von Schablonen, zwei ganz neue von Tim Holtz (Trellis Layering Stencil and Floral Layering Stencil), einmal mit Distress Ink und die andere mit weißem Gesso. Nun war der Mittelpunkt dran. Ich finde die Arbeiten von Monika Huculack ganz toll, so habe ich versucht mich ein wenig an ihrem Stil zu orientieren. Damit das Ganze noch ein wenig Schimmer bekommt, habe ich noch Inka Gold in gold und lila, etwas Goldflitter und Goldfaden hinzugefügt. Auch einige Metallverzierungen durften nicht fehlen. Zum Schluß noch ein paar Blümchen, eine Metallplakette und den Wortstreifen aufkleben, das wars.

I wanted to create some lines, inspired by the lines from the reference picture. So first I glued a couple of paperstripes to the background and used a stencil called "shapes" from 13arts and modeling paste. Then I did some stamping - a lot of stamping ;-). Then I added color (Lindy´s Stamp Gang flat fabios and Starburst sprays) and did some more stencilling with two of the brand new Tim Holtz stencils (TRELLIS and FLORAL) with DI and white Gesso. Now I built the vocal point, As I love the work of Monika Huculack, I tried to create my layout layering a bit like she does. For some brightness I painted some Inka Gold in gold and purple, added some golden threat, some gold flitter and metal embellishments. At last I added some small flowers, a metal planque and a word stripe.

Hier noch ein paar Nahaufnahmen:
Here some close ups:


An folgenden Herausforderungen möchte ich teilnehmen:

Dienstag, 12. Januar 2016

Wanderlust Book 2016 - January, the first pages

Hallo zusammen, schön euch hier zu haben! 

Heute möchte ich euch meine ersten Seiten in meinem Wanderlust Book 2016 zeigen.
Wie ihr vielleicht gesehen habt, hat im Januar der Online Kurs "Wanderlust 2016" angefangen - und ich bin dabei! Die ersten Videokurse sind schon gelaufen und waren sehr informativ und inspirierend.
Wir sollten ein Wort benutzen, das beschreibt, wie man sich momentan fühlt. Ich habe "promising" gewählt, was soviel bedeutet wie: hoffnungsvoll, vielversprechend, erwartungsfroh - kurzum ein positiver Blick in die Zukunft.

Hi all, nice to have you here!
Today I want to share with you my first pages of my Wanderlust Book 2016. May be you´ve seen, that started at January 1st, a one year long event of art classes and exploration, "Wanderlust 2016" This is the project I created after watching the first two videos, which were very informative and inspiring. If you don't know about Wanderlust, do check it out here.
We were supposed to choose "One word that describes me today." My word is "promising".
 
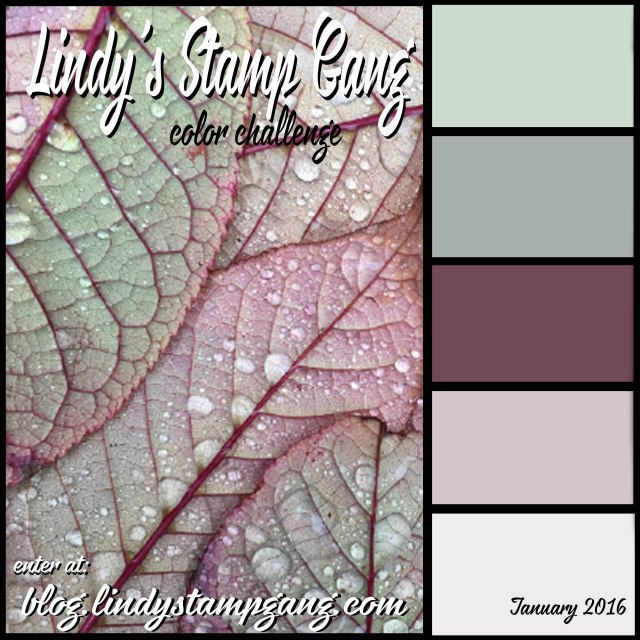
I went after the color palette of Lindy´s Stamp Gang January 2016 Color Challenge and used the following colors:
Ich habe mich an der Farbpalette von Lindy´s Stamp Gang January 2016 Color Challenge orientiert.
Folgende Farben habe ich verwendet:

Hier meine Seiten:
Here are my pages:

Noch kurz, wie ich der Reihe nach vorgegangen bin:
- weißes Gesso
- Papierstreifen und -stückchen aufkleben
- Texture Crackle Paste durch eine Schablone von 13@rts, trocknen lassen
- Einfärben mit Farbsprays, Magicals (Pigmentpulver), Gesso, ein Hauch von Inka Gold 
- stempeln mit 2 verschiedenen Stempeln
- Akzente setzen mit wasservermalbarem Farbstift und weißem Marker und lila Fineliner
- Bild unterlegen (4 Schichten) und aufkleben, Schmetterlinge aufkleben bzw. -rubbeln
- handschriftlich das Wort "promising" mit Schreibfeder und schwarzer Tinte und am Rand 
  mit lila Fineliner schreiben

A quick step by step:
- white Gesso
- glue down paper stripes and shapes
- Texture Crackle Paste through a stencil of 13@rts, let dry
- colouring with mists and Magicals, Gesso and a hint of Inka Gold
- stamping with 2 different stamps
- setting accents with watercolour pencil, white pen and purple fineliner
- layering the picture (4 layers) and glue down, embellishing with butterflies (fuzzy cut and 
  rub on)
- handwriting the word "promising" with a pennib, ink and a purple finliner around the edges

Hier ein paar Details:
Here some details:


Hier noch ein Foto in einem anderen Licht - man sieht hier so schön, wie die Texture Crackle Paste erhaben ist!
Here a photo in another light - you can see how the Texture Crackle Paste stands out!

Ich hoffe, meine Art Journal Seiten gefallen euch! Vielen Dank fürs Reinschauen!
Now I hope you like my art journal pages! Thank you for dropping in here!

In following challenges I want to participate:
http://theartisticstampercreativeteam.blogspot.de/2016/01/january-2016-new-creative-challenge.html
http://studio75pl.blogspot.de/2016/01/wyzwanie-1-challenge-1.html
http://blog.lindystampgang.com/2016/01/01/january-2016-color-challenge/
http://craftstamper.blogspot.de/2016/01/take-it-make-it-challenge-january_8.html